I Don’t Know Ale … Conclusion (Bottling & Tasting)

I Don’t Know Ale … Conclusion (Bottling & Tasting)

bottling beer 11Bottling beer is an exciting step for us in the brew process as we know we are close to tasting (which is my favorite step) …  Depending on the style of beer they may age for months in the bottle or just need a bit of time to bottle carbonate.  This style (English IPA) just needed time for carbonation.  We are hoping in the near future to add a kegging system but we have been going back and forth on designs, I am for one idea Huz has another so until we decide we bottle… Let’s get to it!

Bottling: (This is a pretty straight forward process)

We bottled 6 days after we dry hopped (we were suppose to wait 7 but we had a crazy Sunday so we bottled 1 day early).  To bottle you:

  • Remove the dry hop bag if you have used one.
  • Rack the beer from the secondary fermenter to a bottling bucket using your auto-siphon
  • Add bottling/priming sugar, in this case we bottled at 2.7 volumes to give it a nice carbonation but also stayed in the style guidelines
  • Fill using a bottle filler
  • Cap
  • Give it 1- 2 weeks to carbonate
  • Below are a few pictures of these steps.

Bottling Beer 7

Tasting:

Since we brew a lot and like to have different varieties on hand I bought some 1 inch round labels and label each beer with the name, bottling date, and ABV.  This helps in telling them apart.

To read more about the “Beer Judge Certification Program” and the “14A. English IPA” style guide lines check out here.

We waited about 9 days after we bottled it to try it and  see how it was conditioning and as we suspected it was ready to go… here was the result!

  • I Don’t Know Ale:  This beer delivers with a medium amber color that has a nice light body mouth feel with good carbonation.  It offers refreshing notes of mango fruitiness, taking you away to a tropical paradise.  Also finishes like a true English Ale offering sufficient toasty/biscuit malt flavor.  Bring on summer, ABV 5.1%!

Bottling Beer  10

Bottling Beer 9

This will be be a great spring/summer beer now can we just get this weather to cooperate?  This concludes the overview on how to brew.  We have a Belgian Style beer on deck to brew over Huz’s spring break called “A Wif of Belgian Blonde”.  We also have a French style Saison upstairs in the primary’s which we are hoping is another great summer brew.  Please let me know if you have any questions! Enjoy ~ Megan

I Don’t Know Ale… Part 2 (Racking & Dry Hopping)

Fast forward about 10-12 days after the bulk of the fermenting is done.  It is time to get the trub (gross stuff at the bottom of the primary fermenter) off the beer so it does not impart off flavors to our beer.  This step is called racking.

Here are the steps of racking beer into the secondary fermentor, with pictures to follow:

  1. Wash and sanitize a 5 gallon and 3 gallon carboy.  Remember we made 8 gallons.
  2. Using an auto-siphon start filling your carboys.  We like to start with the 5 then move to the 3.
  3. Once both are full, re-airlock, and condition in the secondary fermentor until it starts to clarify.  Usually a week or two depending on the sytle of beer brewed.  For this specific style it will take about a week, then we will dry hop it.  Will explain that next.
I Don't Know Ale in primary fermenter.  Ready to be racked over to secondary.

I Don’t Know Ale in primary fermenter. Ready to be racked over to secondary.

Sanitized carboy's ready for action.

Sanitized carboy’s ready for action.

Filling the 5 gallon carboy, then we repeat for the 3 gallon.

Filling the 5 gallon carboy, then we repeat for the 3 gallon.

All set, to condition in secondary fermenter.  Don't the look so good?

All set, to condition in secondary fermenter. Don’t they look so pretty?

*****DRY HOPPING******

This is actually the first beer we have dry hopped.  Dry hopping means adding hops after the brew process in the secondary fermenter.  About 9 days  after we racked this beer to the secondary it had clarified nicely.  Thus is was time for the hops.  We added 1 oz of citra hops, so .625OZ to 5 gallon and .375OZ to 3 gallon.  The hops were measured out in sanitized nylon paint bags and dropped into carboys.  The hops are to sit for exactly 1 week then we bottle.  So we made sure we did it on a weekend because bottling takes a bit of time.  I am hoping to be able to keg soon!  Pictures below of beer…

Hops going in.

Hops going in.

Hops in, 7 days later it will be bottling time.

Hops in, 7 days later it will be bottling time.

Note: I just wanted to show a side by side of what the beer looked like the day we racked into the secondary to the day we added the hops, you can see what I mean by clarification.  A lot more of the yeast that was in suspension settled out.

Side by side, notice the clarification?

Side by side, notice the clarification?

Please let me know if you have any comments or questions… Next up bottling!  Enjoy ~ Megan

I Don’t Know Ale… Part 1

I Don’t Know Ale… Part 1

This post is for my cousin Nick, he asked me to blog about home brewing a while ago, so I am going to try over the next few weeks to show the different steps and progression of this ale.  This long post is of brew day, usually about a 6 hour process for us.  I think brewing can be as simple or as complex as you like and your resulting beer will reflect this.   There are also a lot of ways to achieve the same end product in home brewing, thus this post reflects our process based off our equipment, setup, and knowledge we have to date.  On this 40 acre farm there is usually a lot brewing, both literally and figuratively… Let’s get to it!

Here is the recipe we designed on BeerSmith, a program I would highly recommend if you are into designing your own beer, which we are.  This beer is based off English IPA style guidelines.  The name is a direct result of Huz not knowing what he was creating when first designed and it stuck.

I Don’t Know Ale Recipe

Type: All Grain
Batch Size: 8.00 gal
Boil Size: 10.49 gal
Boil Time: 60 min
End of Boil Vol: 9.36 gal
Final Bottling Vol: 7.25 gal
Fermentation: Ale, Two Stage
Date: 21 Nov 2013
Brewer: Huz & Wif
Equipment: 1 Huz & Wif All Grain Set-Up
Efficiency: 70.00 %
Est Mash Efficiency: 78.8 %
Taste Rating: 30.0
Ingredients:
Amt Name Type # %/IBU
12 lbs Pale Malt, Maris Otter (3.0 SRM) Grain 1 75.0 %
1 lbs Biscuit Malt (23.0 SRM) Grain 2 6.3 %
1 lbs Caramel/Crystal Malt – 60L (60.0 SRM) Grain 3 6.3 %
1 lbs Caramel/Crystal Malt -120L (120.0 SRM) Grain 4 6.3 %
1 lbs Melanoiden Malt (20.0 SRM) Grain 5 6.3 %
2.00 oz Cascade [5.50 %] – Boil 60.0 min Hop 6 24.3 IBUs
2.00 oz Cascade [5.50 %] – Boil 30.0 min Hop 7 18.7 IBUs
1.00 oz Cascade [5.50 %] – Boil 5.0 min Hop 8 2.4 IBUs
1.00 oz Citra [12.00 %] – Boil 5.0 min Hop 9 5.3 IBUs
1.0 pkg Burton Ale (White Labs #WLP023) [35.49 ml] Yeast 10
1.00 oz Citra [12.00 %] – Dry Hop 7.0 Days Hop 11 0.0 IBUs

Gravity, Alcohol Content and Color

Est Original Gravity: 1.052 SG
Est Final Gravity: 1.011 SG
Estimated Alcohol by Vol: 5.4 %
Bitterness: 50.6 IBUs
Est Color: 14.9 SRM
Measured Original Gravity: 1.051 SG
Measured Final Gravity: 1.010 SG
Actual Alcohol by Vol: 5.4 %
Calories: 168.6 kcal/12oz

Mash Profile

Mash Name: Single Infusion, Light Body
Sparge Water: 4.21 gal
Sparge Temperature: 168.0 F
Adjust Temp for Equipment: TRUE
Total Grain Weight: 16 lbs
Grain Temperature: 72.0 F
Tun Temperature: 72.0 F
Mash PH: 5.20
Mash Steps
Name Description Step Temperature Step Time
Mash In Add 20.00 qt of water at 162.0 F 148.0 F 75 min
Mash Out Add 12.80 qt of water at 205.6 F 168.0 F 10 min

Sparge: Fly sparge with 4.21 gal water at 168.0 F

Mash Notes: Simple single infusion mash for use with most modern well modified grains (about 95% of the time).
Our Gravity Fed Brew Setup:
1) Brewing water is heated in Hot Liquor Tank (HLT)
2) Mashing happens in Mash Lauter Tun (MLT)
3) Wort is drained into Boil Kettle (BK)
(explanation taken from brewers friend)
brewing 1
Brew day steps/pictures: The below shows how we go from grains, water, & yeast to delicious brews. (**Disclaimer: this will be a basic overview, if would like more of a detailed overview please send us a comment)
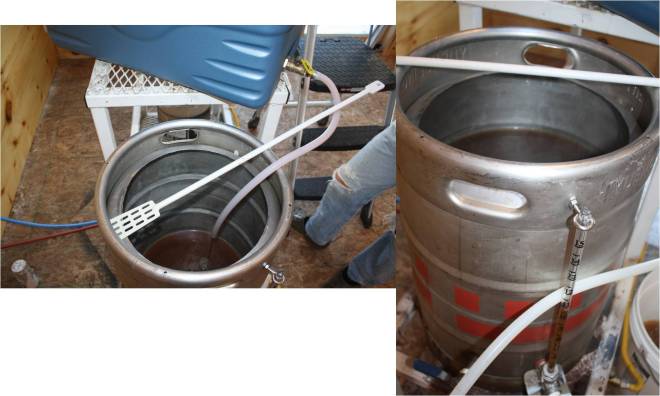
Dump your 16 pounds of cracked grain into your mash tun (MLT).  The converted cooler helps to keep the water at a certain temperature, thus converting the starches in the crushed grains into sugars for fermentation.  Then per the recipe above heat the water in your HLT to 162 degrees and add 20 quarts, by the time all 20 quarts have been added your new grain temperature should read 148 degrees.  Stir the mash grain bed well and close lid.  Let sit for 75 minutes.  See this step below.
brewing 2
When the 75 minutes is up you have to add 12.8 more quarts of hot water at 205.6 degrees to bring the temperature of your mash up to 168 degrees.  Then let this sit for 10 minutes.  The idea here is you are extracting different starches.  Once the 10 minutes is up, you fly sparge as you drain into your boil kettle.  Meaning you will add 4.21 gallons of 168 degree water to the top of your mash as you mash out.  It is important to keep both of these at the same speed.  Fill your boil kettle up to 10.49 gallons. (10.5 is fine )
brewing 3
Then turn it on, once it comes to boil watch is very close as it will hot break.  Meaning depending on the beer it will foam like crazy or even boil over if you do not watch it.  Once all the proteins break down, the foaming will stop and you will have a rolling boil.  To help keep the hot break tame:  stir, spritz with a water bottle, or turn heat up and down.  Once it has past its hot break keep at a rolling boil for 60 minutes as you need to boil out enough moisture to bring your beer down to 8.5 gallons.
There are 3 hops additions with this recipe, so at the start of the boil you add the first, then again at 30, then again at 5.  Depending on the time you add the hops depends on the flavor bittering vs. aroma.  The hops added at 60 minutes add bittering.  The hops added at 30 add a bit of both, and the hops added the last 5 of boil add all aroma.  Those are the hops notes you taste when you drink your beer.  We put our hops in nylon paint bags to keep them contained.  Here are some pictures of the boil.
See the foam?  Hot break almost done.

See the foam? Hot break almost done.

Look closely and you can see the hop bag floating in the boil kettle with the wort.

Look closely and you can see the hop bag floating in the boil kettle with the wort.

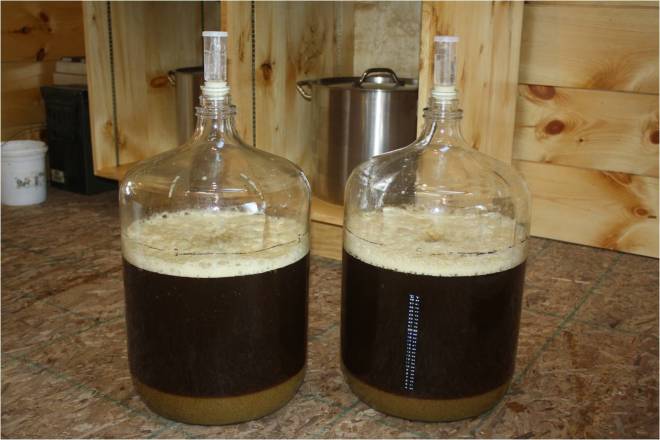
Once this has boiled for 60 minutes, you need to cool it and cool it fast.  These is where keeping things clean and sanitized is important.  From now on clean is key to good beer.  You use a wort chiller to chill quickly to 67/68 degrees.  Chilling quickly helps prevent bacteria from growing.  Once cooled to 68 degrees we split our 8.5 gallons into two 6.5 gallon sanitized carboys.   Pictures below of chilling, what I forgot to take a picture of is the lid we put on top while chilling to keep away particles from air.  Remember clean clean clean from here on out!

brewing 6

Once you add your cooled wort to your sanitized carboys you shake and aerate the wort before adding yeast.  John Palmer explains the “why aerate” well here:  Aeration is Good, Oxidation is Bad.  Once a aerated, pitch yeast, and then airlock and do not shake again… we grow our yeast from one tube to save money but this is a whole different process.  Comment me if you want more details.  Below is aerating & pitching the yeast.

Shaking to aerate, remember to pop the top a time or two to let in air.

Shaking to aerate, remember to pop the top a time or two to let in air.

Splitting our yeast evenly into both carboys.

Splitting our yeast evenly into both carboys.

Finished Product:  I Don't Know Ale.

Finished Product: I Don’t Know Ale.

Last step to this post for now is just make sure over the next few days you watch this beer.  Try to keep it around 67/68 degrees.  When it ferments and the insides are going crazy that creates a heat, so to try to keep it in a cool room.  We keep it in our upstairs bedroom during the winter as we do not heat that room much.  So the cool room temp helps to keep the temperature more regulated.  Then once the fermenting has slowed you can move it to a bit warmer room just trying to keep it in that temp range.  Here is a picture of 1.5 days later, I say the yeast is working, isn’t it pretty?

brewing 10

Notes/Tips:

  • Will try to keep you posted as this beer progresses, currently it is still sitting in the primary fermentor, and we hope to rack it over to the secondary fermentor this week… Stay turned.
  • Also from here on out, remember clean clean clean, sanitize is key.  We use star-san as our cleaner of choice.
  • We treat the water when we brew all grain with some gypsum, calcium chloride, and lime.  What we have learned is water can really affect your efficiency and your flavor.  For more on this please comment and we can go into more detail.
  • Just to reiterate this post is a basic overview of our brew process, if would like more of a detailed overview please send us a comment

Again this was a basic overview, hope you enjoyed and please let me know if you have any comments or questions!  Enjoy ~ Megan

Snow Day Chili

Snow Day Chili

It is winter in Michigan at its finest right now!  Huz is on snow day # 3 this week due to the frigid cold, and blowing winds.  The winds have been keeping our lovely dirt roads snow drifted shut, and at times we find ourselves praying the snow plows remember us.  Thankfully the food preservation work we do in the summer allows us to go for weeks without having to go to the grocery store this time of year.  Here is one of my favorites to make,  I like to call it “snow day chili” because for me this recipe requires no trip to the store due to all the ingredients being put up this summer.  It is so simple and flexible to make, plus it warms you up on cold snowy nights,  makes great left overs, and pairs nicely with a home-brew.  Also this recipe is gluten-free, just make sure any store bought product you use is marked as such on the label, if you use home canned stuff then you are good to go.  Let’s get to it!

Ingredients: (This batch size make about 12-14 cups)

  • 1 pound of ground beef
  • salt and pepper to taste ( I used about 1/2 tsp of each)
  • 1 large clove of garlic
  • 1 medium or large onion (whatever you got laying around) – chopped
  • 1 cup of dry kidney beans – will teach you how to re-hydrate below, these are way better than the store-bought canned stuff.  We grow our own dry beans but you can buy them in the store for super cheap.
  • 3 Quart Jars of home canned tomato sauce, See that post here, the store bought version would be something like  Hunts Tomato Sauce
  • 1 bag of frozen green peppers, See that post here, this is optional but we like the flavor it adds
  • 1/2 teaspoon Dehydrated Super Chili’s or the store bought version is called Crushed Red Pepper Flakes
  • 1/2 teaspoon Cumin – this gives it a nice savory chili flavor
  • 1 fresh jalapeno, optional – I happened to have this in the house so I chopped it up and threw it in, adds nice flavor and heat.

Directions:

Re-hydrating dry beans is super easy it just takes a bit of time, so around lunch time start this step, or the day before…then you have them ready when you need them.

  1. In a large pot dump your cup of dry kidney beans and fill with water until covering about a good inch above the beans.
  2. Turn on high heat and bring to a boil, once boiling turn off and place cover on and let them set for about an hour.  The idea is just get the beans to start absorbing the water.
  3. After an hour turn your burner on to low/simmer and stir every 15-20 minutes or when you think about it.
  4. Just keep cooking until they look soft, they might split a bit.  Once this happens try one are they soft all the way through?  If yes turn off, if not keep cooking…  NOTE: these will have more texture than the canned beans you get at the store.
  5. Once they are done to your liking turn them off, drain, and store until you make the chili.  See these steps below.

Chili 1

Then when it gets closer to dinner, brown your meat with the salt, pepper, crushed garlic, and chopped up onions.

Chili 2

Once your meat is cooked, dump your meat, beans, 3 quarts of tomatoes, peppers, 1/2 tsp cumin and 1/2 tsp of super chili’s into a large stock pot.  (NOTE add 1/4 tsp of super chili if you do not like much spice)

Chili 3

Then turn on to medium-high and cook until starting to boil a bit, remember to stir frequently, once boiling move heat to low and cook for a 20-30 minutes longer.  Then give it a try, what does it need to meet your taste palate?  Maybe more salt, more spice, etc.  Add as you see fit.  I ended up adding a bit more super chili’s since we like it spicy.  Below is the finished product!

chili 4 chili 5

Tips/Notes:

  • If you use the store-bought canned tomatoes you might need to cook it on low a bit longer to thicken your chili.  Our sauce is already cooked down to the perfect chili thickness
  • Serve with cheese on top if you wish
  • Pairs nicely with home-brews and french bread (skip this part gluten-free folks)
  • This makes awesome left-overs since the flavors have more time to meld.

Please let me know if you have any comments or questions!  Enjoy ~ Megan

Simple Granola Recipe (made with ingredients around the house)

Homemade yogurt is not complete without some crunchy granola.  Granola adds nice flavor, crunch, and extra protein for stay power to your yogurt.  The problem with homemade granola is it can get so darn complicated and expensive to make.  Thus, with the goal of making a quick & simple granola to add to my homemade yogurt I turned to the internet.  I found a simple recipe with ratios, this I could work & experiment with… On the first attempt I made a small batch and while it turned out flavor-wise  it was not very “granola-ie”.  I used the wrong oatmeal thinking quick oats would be just the same as whole old fashion – but they are not.  Also this first attempt was lacking the “clump factor” of granola.  For attempt two I got to thinking about clumping & the very complex granola recipe in my cookbook, which I have never made but seen made and it is indeed “clump-a-licious” granola.  So with that in mind I made it again, and added an egg.  The egg is the one item missing from the online recipe but found in my complicated cookbook recipe.  The egg, did the trick in helping the granola to hold together better.  My favorite part about this recipe is that it is ratio based and simple!  The recipe offers ratios and gives you the ability to twist, create, and design a healthy granola that fits into your unique food style.  Let’s get to it…

Ingredients: 

  • 2 cups oats – the one picky ingredient in the whole recipe, use whole old fashioned oats if you can, also get gluten free oats, if you need it to be gluten free
  • 1 cup any mix of chopped nuts and/or seeds, whatever sounds delectable to you.  I use all almonds.
  • 1/2 cup mix of dried fruit (chopped roughly, if large) **Optional** I omit this because dried fruit in yogurt does not appeal to us.
  • 1/4 cup oil – I use extra virgin olive oil, but melted butter could work also
  • 1/4 cup syrupy sweetener or mix thereof (honey, maple syrup, etc.)
  • 1 egg
  • 1/4 teaspoon cinnamon – **optional** you can also add other spices which sound good to you.

Directions:

First we are going to slightly toast our oats and nuts.  Turn you oven on to 350.  Measure out your oats and nuts and dump into a 12×15 bar pan or 9×13 cake pan. Mix with your hand and spread out so the the bottom of the pan is covered.  Once oven is up to temperature, place pan in oven and bake for about 9 or 10 minutes.   Check every 3 minutes and give it a little stir, this ensures an even “roastyness” & “brownness”.  Check out pic’s of this below.

granola 1

Meanwhile, measure out a 1/4 cup of honey or whatever syrup sticky thing you want to use and 1/4 cup of oil into a small sauce pan.  Turn on a low heat stir occasionally and get it bubbling.  Then turn off and wait for your roasted oats and nuts to finish in the oven.

granola 2

Once your oats and nuts are done roasting in oven remove and dump into a metal bowl.  Be careful they will be hot and keep your oven on.  At this point add your cinnamon or other spices if you desire, mix.  Then add egg, and oil/honey mixture and stir.  Once incorporated, take a second to spray the pan you used for the roasting with a bit of non-stick stuff, then spread the mixture back out on to your greased pan and return to oven.

granola 3

Once in the oven for the second time, set timer for 10 minutes.  Once it rings open the oven check on progress, maybe give a quick stir so it cooks evenly and then cook it up to 5 more minutes.  I prefer mine a bit darker to bring out the “roastyness” and “goldenness” so I cook mine the full 15 minutes but you can pull it out at any time.  Really flexible…  Once out of oven remove from pan to wax paper or to a metal bowl if adding dried fruit.  This is the point you add your dried fruit if you want it, just stir it in.  I usually omit because we do not like it in our yogurt.   NOTE:  sometimes this is a bit soft while warm, but as it cools it does harden; and leave as intact as possible to help form those nice clumps.

granola 4

Once cool, store in an airtight container and enjoy plain as a quick snack on the go or coupled with some delish homemade yogurt and strawberry freezer jam – yum.

granola 5 granola 6

Notes/Tips:

My favorite part about the recipe… taste it once cool then make some tasting notes and adjust for next time until you have it just how you and/or your family like it:

  1. Too salty, not enough salt – maybe next time add some.
  2. Too sweet/not sweet enough?  Maybe next time go a bit higher on the honey or use a different sweeter.
  3. Is there an over powering flavor?  Maybe tone it down for next time.
  4. How was the cinnamon?  Too weak or too strong, adjust how you see fit.

Please let me know if you have any comments or questions!  Enjoy~ Megan

***PS:  Check out what we have been up to in our new addition canning kitchen.  Walls are up,  stove cabinet built, and stove is installed.  Next step is to get the hood vent installed.  We are so excited to use this range this summer…. Enjoy!

stove 1 stove 2

Easy Homemade Yogurt

I love making yogurt in my dehydrator… it is so easy, so fresh, and those live and active cultures are oh so good for your gut – seriously people!  I get excited just thinking about those healthy cultures chillin in my gut!!!  This fall after going through quite a bit of store-bought plain yogurt  for breakfast I decided it’s time to create, and eliminate another processed food from Huz’s and my diet.  So a quick call to Mom (who makes it occasionally) coupled with a quick “how to” Google search got me started.  Now Huz and I are hooked on the good stuff!  Again I cannot stress how much better this stuff is for you over the commercial brands.  It has so much more flavor, so much less packaging waste, it is gluten free, and the best part of all… (seriously)…(wait for it)… it has TRUE probiotics – 100% gut approved!  Let’s get to it…

Ingredients:

  • 1 or 2 or 3 quarts of Whole Milk – whole is best, the thinner the milk the runnier the yogurt, so don’t go below 2% but really whole is the best.
  • 1/4 or  1/2  cup plain yogurt – either from a plain yogurt you buy at the store or reusing from the last batch. (See tips below for using a culture starter pack)
  • A dehydrator, yogurt maker, or some way to keep your yogurt at a constant temp of about 110-115 degrees for 6-12 hours.  For this blog I will be using my dehydrator.
  • A thermometer, I just use my candy thermometer, but any quick read one should do the trick.

Directions:

Measure out the amount of milk you want to make into yogurt dump into a large sauce pan and turn on the heat to low/medium-low, I usually make 2 or 3 quarts worth.  The time I made this batch Huz was home for Thanksgiving break so I made a 3 quart batch.  Picture below.

Yogurt 1

While this is slowly coming up to 185 degrees and you are stirring occasionally, I wash and sanitize my jars.  Due to our love of beer brewing we have Star-San in the house, an acid based sanitizer that I spray my jars with.  If you do not have this, just make sure you give your jars a good wash and rinse well in hot water (that is all my Mom ever did).  Then turn them over to dry until ready to use.  Here is a picture of my station all set up.

Yogurt 4

Over the low heat, bring the temperature of the milk up to 185 degrees.  You will start to see the milk get a bit foamy as it reaches this point.  Once it reaches 185 (or right around there) remove from heat and cool back down to 115 degrees.   If you want to move the process along an ice bath works nicely.  See my ice bath below, just be-careful not to get any water in there.  You are working with bacteria and you do not want to introduce other bacteria friends to your yogurt makin’ party.

Yogurt 2

Once the temperature is down to 115, remove from ice bath.  Add your starter, the plain yogurt you saved from your last batch or you got from the store.  See below a picture of my starter about to go in, then I gently whisk it around.  No need to beat it to death, just introduce those yummy live cultures and they will do the rest while cooking.

Yogurt 3

Once the starter is gently mixed into your milk, pour into jars.

Yogurt 5

Once you have filled your jars, place them in your dehydrator,  yogurt maker,  cooler, or however you intent to keep them warm.  Keep them at about 115 degrees for 6-12 hours.  I usually cook them about 10 hours.  The longer they cook, the tangier the yogurt, this also depends on the strain of bacteria you use and how many times you have used it.   See below for a few shots of  the dehydrator cooking away.  Side note:  I keep a thermometer in mine as my dehydrator tends to run a bit hot.

Yogurt 6

10 hours later – DONE!  You can do this over night, or start it in the morning and cook all day.  It is easy, and oh so good for you!

Yogurt 7

Yogurt 9

Eating Tips:

  • This will keep an easy 2 or 3 weeks in your fridge, maybe even longer, it usually does not last that long here.
  • Delicious mixed honey, or homemade jam ( strawberry, peach, cherry, elderberry, peach/raspberry or any other kind you have in your freezer we have tried them all).
  • Even goes great with cranberry sauce.
  • Remember those frozen blueberries we froze earlier this year, toss those in with a bowl.  It is delicious, or use canned peaches, or fresh fruit.  YUM
  • For the extra crunch add some homemade granola (my next post)!

Other Tips/Notes/Nutritional Facts:

  • Only reuse a batch about 3 or 4 times, then refresh with a fresh strand of starter either from a plain yogurt from the store or from a culture packet from a home-brew supply store…
  • Below is one culture we have been using from Siciliano’s, it has more bacteria cultures in it than the commercial brands, thus better for your gut!
  1. SWEET CULTURE INCLUDES: Lactose, Dry milk powder, (ST) Streptococcus thermophilus, (LB) Lactobacillus delbrueckii subsp. bulgaricus, (LA) Lactobacillus acidophilus, (LBL) Lactobacillus lactis, Bifidobacterium lactis, autolyzed yeast
  • Lastly here are the nutritional facts using whole milk  (thanks to my sister in law for this ability now on my blog)!  This is estimated off of 1 cup of yogurt – thus 1 quart would serve 4 people.  I just wish this would show all those live active cultures, they are so good for you!

Yogurt 8

Please let me know if you have any comments or questions!  Enjoy ~ Megan

How to Make Toffee, a.k.a Almond Butter Crunch (Picture Tutorial)

How to Make Toffee, a.k.a Almond Butter Crunch (Picture Tutorial)

Toffee 1This recipe makes me think Christmas!  My Mom and her family have been making this recipe for years, growing up my job was always the stirrer.  I have many memories of my mom making a boat load of this stuff of all of our teachers at elementary school (remember I am one of 6 children).  It is one of those traditional treats Huz cannot wait for me to start making after Thanksgiving.  Usually he is begging me to make it the day after Thanksgiving, black Friday – HA, to Huz it is Toffee Friday!  Technically you can make this treat anytime of the year, but in our family it is an after Thanksgiving, Christmas, New Year thing!  I have tried to really be thorough on this post so you are not intimidated.  This recipe is not hard to make it is just a bit time sensitive at stages and requires a few of the right tools/ingredients to make your toffee a success… So let’s get to it!

Candy Ingredients:

  • 1 Cup Butter (Must use butter, Land o Lakes is best but make sure you use BUTTER)
  • 1 1/3 Cups of White Sugar
  • 1 Tablespoon of HONEY or Karo Corn Syrup (I use Honey as it has almost the same structure of Corn Syrup plus it is natural making my toffee less processed – I can here my mom cringe now as she prefers Karo Syrup, old habits die hard I guess)
  • 3 Tablespoons of Water
  • 2 – 6 ounces Hershey’s Milk Chocolate Bars (so you need 12 oz total, 6 oz for each side, keep reading it will make sense)
  • Nuts (Optional) – Almonds finely chopped or Walnuts (I use Almonds: the sliced ones, then I lightly toast them for about 5 mins in oven at 350 & chop them)
  • ***You will need a Taylor Brand Candy Thermometer*** or a good candy thermometer that reads up to at least 325 degrees.
  • Picture below of all ingredients…  It is so cool to think that when all the below are combined and cooked at the proper heat a chemical reaction happens and you get candy… YUM… now I am staring to see why Huz likes Chemistry so much!  There is so much chemistry to food!

toffee 2

Directions:

In heavy saucepan 2-3 quart size, melt butter then add sugar, honey (or karo corn syrup), and water. See picture of these stages below.

toffee 3

Stirring occasionally bring to boil and cook over a medium to medium high heat until it reaches 300 degrees – “Hard Crack” stage on your candy thermometer.  Watch carefully and stir pretty constantly once it reaches 280 degrees, it will rise quickly.  It colors and browns as it cooks.   Here is a photo montage of this process, it helps a ton to see the different stages the candy goes through as it cooks.

toffee 4

Remove from heat when it reaches 300 degrees or the hard crack stage on your candy thermometer – this stuff is extremely hot, so be careful.  Working quickly, stir well and pour/spread onto a large cookie sheet.  We like to pour it out to an 11X11 inch size pan so you get a nice area to spread an even thin layer.  NOTE: The cookie sheet will get very hot so it should be on a cooling rack or silicone pad (that is what I use).  See pictures below!

toffee 5

Let begin to cool, after 2-5 minutes carefully touch top to make sure it is firm enough to wipe the top off with a paper towel (to remove excess oil) the paper towel should slide over easily without sticking. 

toffee 6

Break apart 6 Ounces of a Hershey’s milk chocolate bar into individual squares and randomly place on top of warm toffee. Let sit until the chocolate melts then spread.   Note –  it is hard to find the larger bars so you might have to buy the 4.4 OZ bars and use 1.5 of them and that will give you just over 6 OZ per side, and the little extra chocolate is OK!  

toffee 7

Optional: sprinkle a light coating of almonds or walnut finely chopped over top.   I use Almonds: the sliced ones, then I lightly toast them for about 5 mins in oven at 350 & chop them and sprinkle those on top.  Its has a nice flavor.  See finished candy below!

toffee 8

Let this sit over night or until it is firm and set up (6-8 hours).  When firm this will lift off the cookie sheet and turn it over to put chocolate on the other side.  Some times it breaks into a few pieces, if it does just piece back together. Again wipe off the top of the toffee with a paper towel to remove any excess oil that may be there.  Melt 6 oz of chocolate bar in a double boiler until melted then spread over top of second side of toffee.  Optional: Top with light coating of finely chopped nuts and let sit until hard (5-7 hours). 

toffee 9

When firm and chocolate has dried on second side, break apart with your hands, store in air tight container at room temperature and enjoy!

toffee 10

Tips:

  • DO NOT put this in the fridge to firm the chocolate faster this will cause the chocolate layer to fall off!  Speaking from experience here people…
  • Use a double boiler to melt chocolate on second side as this reduces the risk of burning your chocolate, like you can do in a microwave.  Again speaking from experience.
  • Disclaimer:  This stuff gets VERY VERY hot when cooking so use extreme caution when removing from heat and pouring onto pan to avoid injury to your self or your counter-tops!
  • This whole process from start of butter melt to spreading on the first side of chocolate takes about 30 minutes.

I hope you enjoy this as much as we do.  To all my family and friend who make this recipe please feel free to chime in if I forgot a tip or suggestion.

As always I welcome your comments or questions!  Enjoy ~ Megan

Simple and Quick Cranberry Sauce

cranberry sauce 1On this very snowy Thanksgiving day my dish to pass is cranberry sauce, which I love to make.  So simple, yet in my humble opinion (and my sisters too) you cannot have a Thanksgiving meal without it.  Plus I like to make it because I like to sample warm sauce, it is delicious.  Again, so simple to make yet I am always shocked when I see people grabbing the canned processed stuff at the grocery store.  (Yuck).  Also check out the bottom of the post for a quick photo update on our “canning kitchen” it finally has walls!  OK let’s get to this simple and quick cranberry sauce…

Ingredients:

  • 1 12 oz bag or 3 cups of Fresh Cranberries (pictured above)
  • 1 Cup Water
  • 1 Cup Sugar

Directions: (**Note: for this post I made a quadruple batch so 4 12OZ bags of cranberries, 4 cups of water, 4 cups sugar)

Dump the cranberries into a colander, pick out any bad ones you see, rise and dump into proper sized pot.  Then add your sugar and water, see this step below.

cranberry sauce 2

Stir to incorporate ingredients and turn on your stove to a medium/medium high heat.  While stirring occasionally you will notice as the mixture heats up the cranberries will start to burst, pop, and split.  Bring to a boil.  Once boiling set timer for 5 minutes, **DO NOT** boil for longer than 5 minutes or the cranberry sauce once cool will set up firm and no longer be a sauce.  See picture below of initial boil stage. Isn’t that color gorgeous?

cranberry sauce 3

Once the 5 minute boil ends transfer your pot to a cold water bath to help cool the cranberries.  This slows the cooking process and prevents any further cooking.

cranberry sauce 4

Stir occasionally to help cool quicker.  Once cool, transfer to your Tupperware or bowl of choice and refrigerate.  Keeps up to a week in the fridge.  YUM, all set for the perfect Thanksgiving feast!

cranberry sauce 5 cranberry sauce 6

If I was Martha Stewart the above pictures would be staged and color coordinated, but I am not that good.  The bowl with spoon was my sample, had to make sure they were good!  Please let me know if you have any questions!  Enjoy ~ Megan

***Canning Kitchen Update – We have walls and a ceiling! (Whoot whoot)  Next is trim, and then urethane to seal, then a custom-built cabinet to hold our 8 burner stove!  Don’t mind the ladder, Huz just finished the last piece today and I was rather trigger happy!  ENJOY

canning kitchen 1

How to Freeze Apple Pie Filling

How to Freeze Apple Pie Filling

Freezer Pie 1Last post on apples in honor of all those apple growers “on the Ridge” here in West Michigan.  After last years devastating fruit crop loss this year was a blessing.  We will be freezing filling for a 9 inch pie.  Huz loves pie, so this is a nice way to make an apple pie in February if we are feeling fallish!  At the bottom of the post check out the honeybee update and the treat Huz made for his “girls” (he is always up to somethings with this all his lady friends).  Lastly, at the moment this blog post is giving me an excuse not to pick at wallpaper.  I made the fatal mistake the other day of picking at it while on the phone, and now I just want it gone.  The last room upstairs in our old farm house with wallpaper!  OK, OK, no more wallpaper venting back to the apples, let’s get to it!

Ingredients:

  • 5 good cups of Apples (about 5-7 apples) – Which ever variety you prefer for pies, I used Spies, but Jonagolds, or Cortlands or McIntosh are also nice.  Also you can mix apples for different flavors.
  • 2 Tablespoons Flour
  • 3/4 Cup White Sugar
  • 1/4 Teaspoon of Nutmeg
  • 1 Teaspoon of Cinnamon
  • Freezer bags

Directions:

Rinse, peal, core, and slice the apples until you have a good 5 cups, I call it a heaping 5.

freezer pie 2

Then measure out your flour, sugar, cinnamon, and nutmeg and mix with the apples.  Note: it takes a bit of mixing to get all the ingredients coated over the apples.

freezer pie 3

Once mixed well, fill a gallon ziplock bag with the apples. Then label and date the bag to ensure proper yearly rotation.

freezer pie 4

All set to place in freezer, then when you are having a craving for apple pie, just defrost, dump into a pie shell (will have to blog about how to make a homemade pastry shell) then top with crust or crumb.  When I use this freezer filling I will try to remember to blog about it to “continue” the story.  Also you can use this as a filling for apple crisp it will fit into an 8x8x2 pan.

Please let me know if you have any comments or questions!  Enjoy ~ Megan

PS:  Quick update on the honeybees.  We inspected them a bit this past Sunday before the nasty weather hit since it was pretty warm, here is the result:

  • We put insulated tops on the hives to keep them warmer during the winter
  • We noticed the hives seemed a bit light on their honey stores for the winter so we made sugar bricks over the past few days which we will be placing on their hives today (11.20).  The bricks will act as an emergency food incase the bees run out of honey.  The sugar bricks are made by mixing 5 pounds of sugar, with 1 1/4 cup of water a 1-2 Tablespoons of corn syrup.  Cook on a medium/high heat and mix constantly to ensure NO burning or caramelizing (I guess that can give the bees dysentery).   Then using a candy thermometer get the temperature up to Soft ball and dump into those disposable foil containers.  That’s it…  When cool remove.  Below is a picture of the finished product and when Huz gets home from school we will be getting these on the hives.

sugar brick

How to Dehydrate Apples

Sorry for the couple month post delay but working crazy hours at a local fall apple orchard (www.schwalliers.com) kept me on my toes… now it is time for some apple posts.  Fall – the time of year for apples in Michigan, yum!  For this post we are going to be dehydrating apples, the one key tool you need is a dehydrator.  You can use your oven, which I have never done, here is a link for that method.  Dehydrated apples are great for snacks, are awesome in trail mix, or even mega-bars!  They are so versatile, and well worth the time (as all good food is)!  Lets get to it…

Ingredients:

  • A dehydrator – we have a Vegikiln.  We love it, we picked this out not too long after we were married and it has been well used.  We picked this model  because it had a nice temperature range.  The range allowed us to dehydrate from 95 degrees – 155 degrees, allowing us to dehydrate fruits, herbs, veggies, meats, etc.
  • Apples – washed
  • Lemon Juice – the from concentrate stuff you can get in large containers at the store
  • Scrap bucket

Directions:

I set up the scrap bucket, washed apples, lemon juice, and dehydrator in kind of an assembly line fashion to be as efficient as possible, see the set up below.

Dehydrate apples 1

Next I half a bunch of apples, core them, cut out bad spots, and slice them.  You can do one apple a time but I think to chunk out each stage makes it go a bit quicker.  Note when you slice the apples you want them about 1/8 inch think, not super thin or thick.   – See below.

Dehydrate apples 2

Once you have a bunch sliced into the lemon juice they go for a quick dip, this helps to prevent browning while drying.  Then lay them out on your dehydrator rack in a single layer.

Dehydrate apples 3

Repeat this process until the dehydrator is full or you run out of apples.

Dehydrate apples 4

Turn on your dehydrator.  The temperature range for fruit on ours is 135-145.  At this range, the apples take about 14-20 hours to dry depending the thickness cut, usually after about half a day I check them and try one to see if it is done.  When done to my liking I turn off the dehydrator and let them cool for a while then bag and store in an air tight container.  They will keep for a 3-6 months this way.  Again this is a great healthy snack and so versatile to use.  See finished product below!

Dehydrate apples 5

Please let me know if you have any comments or questions!  Enjoy ~ Megan