Canning Tomato Sauce

Canning Tomato Sauce

tomato sauce 1This post was supposed to be done a couple of weeks ago but life happened, so for those of you who are still canning tomatoes this is a great way to put them up.  It is time-consuming but very worth the effort, the result is a sweet sauce that is a great base for chili’s, italian dishes, pizza sauce, salsa, veggie dishes, etc!  Lets get to it…

Ingredients/Items Needed:

  • Tomatoes – we use a lot of varieties to incorporate good flavor.  Our favorites are romas, amish paste, hungarian hearts (these three make up the bulk of the sauce), along with some giant belgium, lemon boys, and goliath.
  • Canning salt
  • Canning Jars, rings, and lids
  • Pressure canner – would high recommend an all-American canner if you do not have one, they are awesome and not scary like the old ones are!
  • A large stock pot to cook your tomatoes down in with a heavy bottom to avoid scorching (stainless steel is ideal)
  • A juice/food mill – Would also highly recommend: “The Original All Metal Squeezo Manual Tomato Strainer” – it is the best!  We use for apple sauce too…

***See set-up picture below!

tomato sauce 2

Directions:

Cut your tomatoes into chunks to and run them through your food mill, filling your large stock pot as you juice them.  The mill is nice because it removes the skins and seeds, thus pressing a nice thick pulp into your pot.  See pictures below.

tomato sauce 3

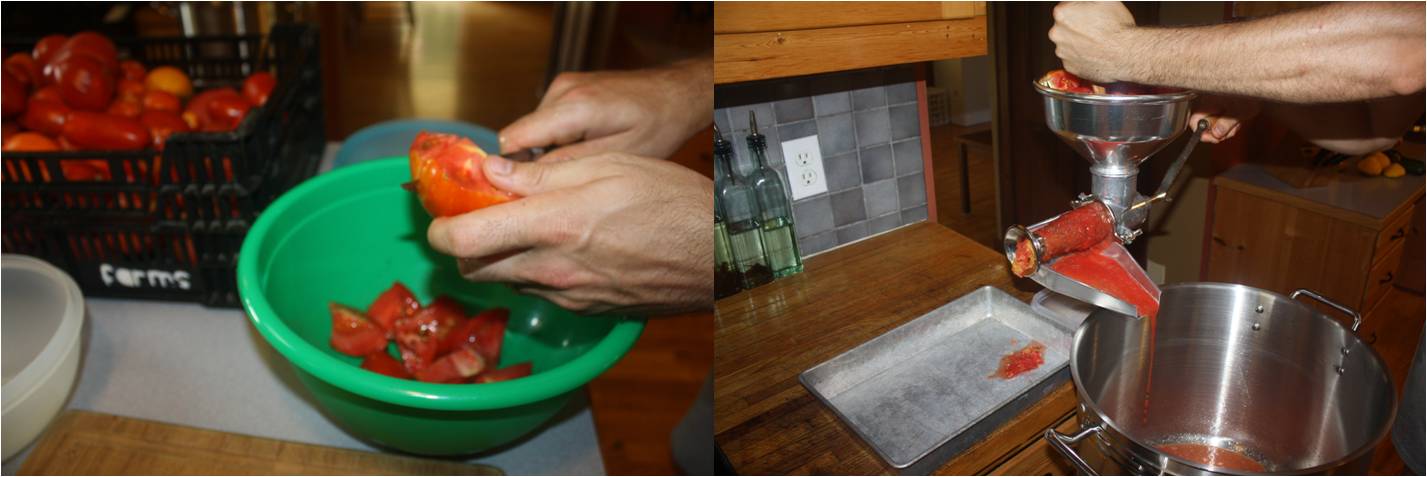
Juice the tomatoes until your pile of tomatoes is gone or your pot is full.  Also while juicing the food mill kicks out the seeds and skins, we call this the tailings.  When the tailings pile up take a moment to run them though the juicer again to get every last bit of juice out.  Below is a picture of running the tailing as well as our full pot ready to cook down.

tomato sauce 4

Next it is time to add canning salt, the ratio you add is between 1/2 – 1 teaspoon per quart.  This pot holds 32 quarts if full, so we figured we had about 7 gallons or 28 quarts so we added just over a 1/2 cup, which was just shy of 28 teaspoons.

tomato sauce 5

Once the salt is added turn it on high.  From there you bring it to a boil, stirring occasionally, once boiling watch out for the hot break.  The tomatoes will initially foam and rise, once the protein structures break down in the sauce the foam will break and you will see a rolling boil.  It is very important to watch for the hot break and stir constantly during or it can boil over and make a huge mess.  Some times we even spritz a bit of water on it, or turn the heat down to help keep the hot break foam at bay.  Once you have it passed the hot break and it is at a rolling boil let it cook.  See hot break photos below.

tomato sauce 6

Once it has hot broke and it is at a rolling boil, just let it cook and cook and cook down stirring occasionally.  This giant pot took about 7-8 hours to get to a nice thickness, the goal is to reduce to at least half its original volume, this will take longer or shorter depending on the quantity juiced.  What is happening here is as it cooks the water is evaporating out leaving tomato goodness behind, thus creating a nice thick sauce.  As it gets thicker you will need to stir a bit more often so it does not burn.  Below is a picture of our pot ready to jar.

tomato sauce 7

Now scoop into jars, seal with lid and ring then process in a canner.  We pressure cook rather than hot pack because it ensures a good seal, after all this effort you do not want to lose your tomatoes to a bad seal.  To process in the canner bring up to 5 pounds of pressure, cook for 5 minutes, then turn off heat.  Remember to leave weight on canner until your pressure is back to 0.

tomato sauce 8

Finished product below – enjoy the fruits of your labor, this one is totally worth it!  Don’t forget to date the lid for proper yearly rotation.

tomato sauce 10

Please let me know if you have any comments or questions!  Enjoy ~ Megan

Blueberries and Peaches!

This time of year is so fresh, and my favorite time to eat.  Apples are starting to ripen, peaches are in full swing, blueberries are winding down but still around and fresh veggies are coming out of the garden left and right.  Wanted to share with you a way to preserve some of those blueberries and peaches.  Lets get to it!

How to Dehydrate Blueberries (super easy and excellent in mega-bars)

Ingredients:

  • Blueberries

Directions:

Last year I did this and is was a royal mess because the recipe called for blanching the blueberries for 30 seconds to puncture the skins.  I had blue juice everywhere it leaked all over every crevasse in my dehydrator and after cleaning up that mess I swore I would find a better way if they turned out good.  Well as it happens they were excellent, especially in the mega-bars They added really great flavor, texture, and as Huz’s says “a nice chew”.  So this year I decided to experiment and I must say was pretty excited when it worked…

  • I pulled a 1 gallon bag of blueberries we had picked and then froze a week earlier.
  • I spread out the frozen blueberries all over my trays, since they were frozen they did not stick together.
  • I turned the dehydrator on to my fruit setting, for ours it is 135-145.  Then left it alone… about 30-ish hours later we had perfect little blueberries all dehydrated, with no mess (alleluia).
  • Depending on the size of your blueberries it might take longer or shorter, I started to check mine after 24 hours.  To test if they were done I ate a few.
  • Once done I stored them all in a ziplock bag with a good seal after they were done.  See picture steps below.  It was so easy and it is awesome to add the variety to our diet.

  blueberry 1

blueberry 2

blueberry 3

blueberry 4

30 Hours later - Finished!

30 Hours later – Finished!


How to Make Peach Freezer Jam

Next strawberry this is my favorite.  I love mixing strawberry and peach in my plain yogurt for a bit of fresh flavor, sometimes I throw in a few frozen blueberry’s too.

Peach Jam is just like making strawberry but with a different fruit.  Thus if you need the step by step with all the tips please see the strawberry post but follow the “peach freezer jam” recipe in the Sure-Jell box for proper fruit and sugar proportions.  Few tips on the peach freezer jam:

  • To make peach jam follow all the tips you did for strawberry but follow the “peach freezer jam” recipe in the Sure-Jell box.
  • The one major difference is lemon juice.  You need to add fresh lemon juice, the juice helps to slow peach browning.  Make sure you use the fresh stuff here that reconstituted stuff you get at the store is lacking in favor and if you use it your peach jam will be lacking in favor also.  I know from experience…  I did it once a few years ago as I did not have lemons in the house and figured it was the same.  I was so disappointed in the flavor of my jam that year.
  • Remember to year date your lids to ensure proper rotation in the freezer.
  • Below is a picture of my finished product.

peaches 1

Please let me know if you have any comments or questions!  Enjoy ~ Megan

Canning Hot Peppers… Jalapeno!

hot pepper 2A brine hot pack canning method for hot peppers.  For this post I picked jalapenos, as I needed 10 jars for my pantry this year.  We average about 1 jar a month plus I have 4 jars left over from last year.  We also use this canning method for hungarian wax peppers and cherry bombs.  All 3 peppers are excellent canned in this style and they are great on/in sandwiches, pizza, mashed potatoes, scrambled eggs, etc.  It is a very healthy way to add a bit of spice to your life.  Lets get to it!

Ingredients:

  • Jalapenos – fresh picked from garden or local from farmers market
  • Brine – see this post on how to make brine…
  • Wide Mouth Canning jars, (wide mouth makes it easier to fill the jars and remove later to eat, also we like the pint size since you won’t go through them as fast)
  • Wide Mouth Canning lids
  • Wide Mouth Canning rings
  • Disposable plastic gloves

Directions:

Rinse jalapenos, then wearing gloves (IMPORTANT you will get pepper juice on your hand so wear gloves and do not put by your eye or face) slice the peppers into rings up to stems.  Fill the jars as you go.  Once done slicing and jars are full it is ok to remove the gloves.  See picture below.

hot pepper 1

Now are going to “hot pack” can our peppers, because if you put them in a pressure cooker you would cook them to death.  Heat up your brine until it is boiling.  (To see how to make brine click HERE) For this batch of 10 pint jars heat up about a gallon of brine.  Once the brine is boiling fill each jar with the boiling brine solution and let them sit for 10 minutes.  This heats up the peppers.  See pictures below.

hot pepper 3

While waiting the 10 minutes, fill a small sauce pan with an inch or 2 of water, put the number of canning lids you will use in the pan, and turn on to a medium-high heat.  This will heat up your lids, and help in the sealing process.  Set on a low heat once boiling until ready for use.

pickles 4

Once the 10 minutes is up drain the brine, which is now spicy into a different pot.  NOTE VERY IMPORTANT:  This brine in the different pot is now “hot or spicy” brine since it has hot pepper oils in it.  Brines you can re-use, but if you re-use this brine say for example canning pickles they will be spicy/hot from the pepper oil.  We save this brine label it as HOT BRINE so we know not to use it canning pickles but we re-use it when we can our cherry bombs,  hungarian wax, tabasco peppers or anything else pepper related.

Once the hot/spicy brine is drained into a different pot refill the jars again with boiling brine, or you can quickly bring the orignal brine you just removed back up to boiling and use that brine again.  This way you do not have a bunch of hot brine on your hands.  Once the jars are full with boiling brine for a second time, top with canning lid, and screw on a ring, hand tight to ensure a good seal.  We have a handy magnetic lid grabber I would recommend having on hand, you can usually find them in the canning section at your local grocery store.  It makes taking the rings out of the water so much easier. See pictures below.

hot pepper 4

Done, they will seal as they cool.  This year we had 1 that did not seal, so it is in the fridge waiting to be used up.  Date the lids once cool, remove the rings, gently wipe the sides of the jar and store until ready for use.  So versatile… great to bring places or spice up your own dishes.

hot pepper 5

Tips: 

  • Don’t forget to wear gloves throughout the cutting process. Huz wore them through the whole process but that is not necessary, he is just super careful because spicy contacts are no fun.
  • Also remember your brine becomes hot/spicy brine after the initial 10 minutes while it is infused with the hot peppers.  You can re-use this brine (brine keeps a really long time) but label it as HOT BRINE..
  • Some peppers we have found to be excellent canned are:  Jalapeno, Hungarian Wax, Cherry Bomb, and Tabasco
  • These will keep for 2 or 3 years if sealed, both hot peppers and vinegar have high acidic levels making them great for preserving.

Please let me know if you have any comments or questions and remember it is good to spice things up in your life every now and then!  Enjoy ~ Megan

How to Freeze Green (Sweet) Bell Peppers

How to Freeze Green (Sweet) Bell Peppers

Have a lot of green or sweet bell peppers getting ready in your garden that you just cannot keep up with?  Here is a good, quick, easy freeze idea to take care of them and enjoy at a later date.  Freezer peppers go well with winter comfort foods such as chilis and soups, or thawed and used as pizza toppings.  Lets get to it!

Ingredients:

  • Bell Peppers
  • Freezer containers or bags.  We usually do pint sizes, it seems to be about the perfect amount for a batch of this or that.

Directions:

  1. Rinse
  2. Remove seeds and core
  3. Cut/chop into pieces
  4. Put into your freezer containers or bags
  5. Date to ensure proper yearly rotation, place in freezer and enjoy later!  Done… pictures below!

Freezer pepper 1

freezer pepper 2

freezer pepper 3

I cut up 7 sweet peppers from our garden, and froze 3 of those freezer containers and 1 pint freezer bag, it took 30 minutes from picking to finish.  I will probably freeze a total of 10.  4 down, 6 to go!

Please let me know if you have any comments or questions!  Enjoy ~ Megan

Pickling Brine Basics

What is Pickling Brine – Even Parts of water and apple cider vinegar strongly impregnated with salt.  We use it for canning pickles, jalapeno peppers, cherry bombs, and hungarian wax peppers.  Next few posts involve using brine…

How to make it?  Lets get started!

Ingredients: For a 2 gallon batch

  • 1 Gallon of apple cider vinegar (16 cups to a gallon)
  • 1 Gallon of water (16 cups to a gallon)
  • 2 Cups of *canning salt* (2 Tablespoons per 1 cup of water and 1 cup of vinegar) *Canning salt is iodine free and does not have any of the anti-caking additives it is just salt, very important to use canning salt.

Directions: For a 2 gallon batch…  We make it up and it keeps for a long long time (few years) until you use it.  We just pour it back into the cider container or plastic jug and store it. 

In a large pot, mix 1 gallon of apple cider vinegar with 1 gallon of water and 2 cups of canning salt.  Once mixed your brine is made.

brine 1

brine 2

brine 3

Tips:

  • The idea here is you mix 8 parts vinegar with 8 parts water with 1 part salt.  8x8x1.
  • For example if you made a 1 gallon (4 quart) batch of brine you would need 8 cups of vinegar, 8 cups of water (16 cups to a gallon) and 1 cup of salt.
  • For example if you made a 1/2 gallon (2 quart) batch of brine you would need 4 cups of vinegar, 4 cups of water (8 cups to a half gallon) and 1/2 cup of salt.
  • Store brine in your apple cider vinegar container and label as brine until ready to use.

Please let me know if you have any comments or questions!  Enjoy ~ Megan